

1
Create your account
Sign up for free with Google or email. After a short setup, Vibely opens the dashboard with your personal workspace ready. For details, see Create an account.
2
Describe your app
The prompt box (“Ask Vibely to create a web app”) sits in the middle of the dashboard. Keep Web selected above it, and describe what you want in plain language.Try this prompt, or adapt it to your own idea:The last line matters. Keeping your first version free of logins and databases means there is less to go wrong, and you can add both later with a single prompt.
Use your own idea instead
Use your own idea instead
Adapt one of these starters, or write your own. The steps in this guide stay the same.Three things make a first prompt work, and none of them is length: name the user, not the feature; name the data in one sentence; and name a vibe (“minimal, lots of whitespace” or “playful, bright, rounded corners”). More in Prompting best practices.
Build a mobile app instead
Build a mobile app instead
Select Mobile above the prompt box to build a native iOS and Android app with Expo. You preview it in the browser and on your phone through Expo Go. Mobile projects need a Pro plan or higher. See Build your first mobile app.
Start from a template instead
Start from a template instead
If you’d rather begin from a working app than a blank prompt, open Templates in the sidebar, pick one, and use it as your starting point. Everything below still applies. See Templates and Remix a project.
3
Watch the first version appear
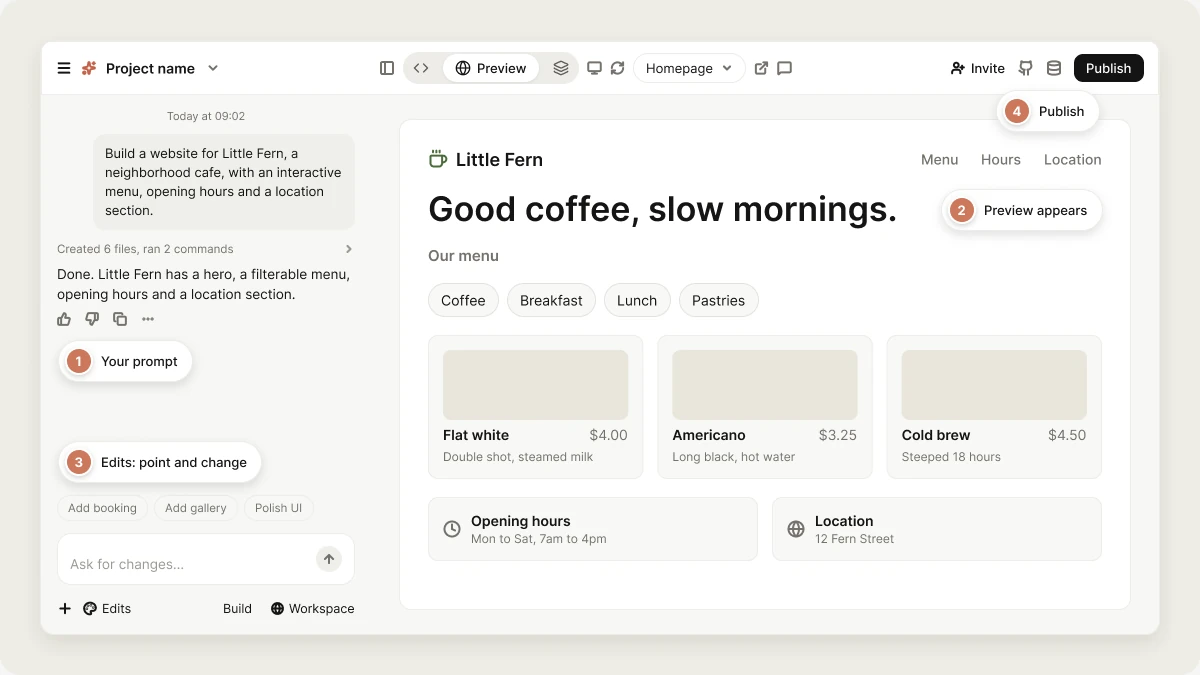
Vibely creates your project and opens the editor: the project chat, where you talk to Vibely, and the preview, where your app runs live. The preview usually appears within seconds, and fills in as Vibely writes files into the running app.You don’t have to wait in silence. Send a follow-up while Vibely works and it is queued to run next.Everything you see is a real, working app, and the code behind it is yours. Every change is saved as a version you can restore, so nothing you do next can break it permanently.
4
Make a change
Ask for one change at a time and check the preview after each. For example:If the app works but doesn’t look or feel like you pictured, say that in plain words too. This is a perfectly good prompt:
5
Tweak it by pointing
For small visual changes, pointing beats describing. Turn on Edits in the composer, click the exact element in the preview, and say what should change. See Visual edits.
6
Check that it works
Before publishing, spend a few moments testing your app:If the preview shows an error, select Try to fix on the error card in the chat. Repair turns don’t cost credits.
- Click every button and link.
- Try the interactive parts: filter the menu by every category.
- Switch the preview to a phone-sized view. Most people will open your link on their phone.
7
Publish
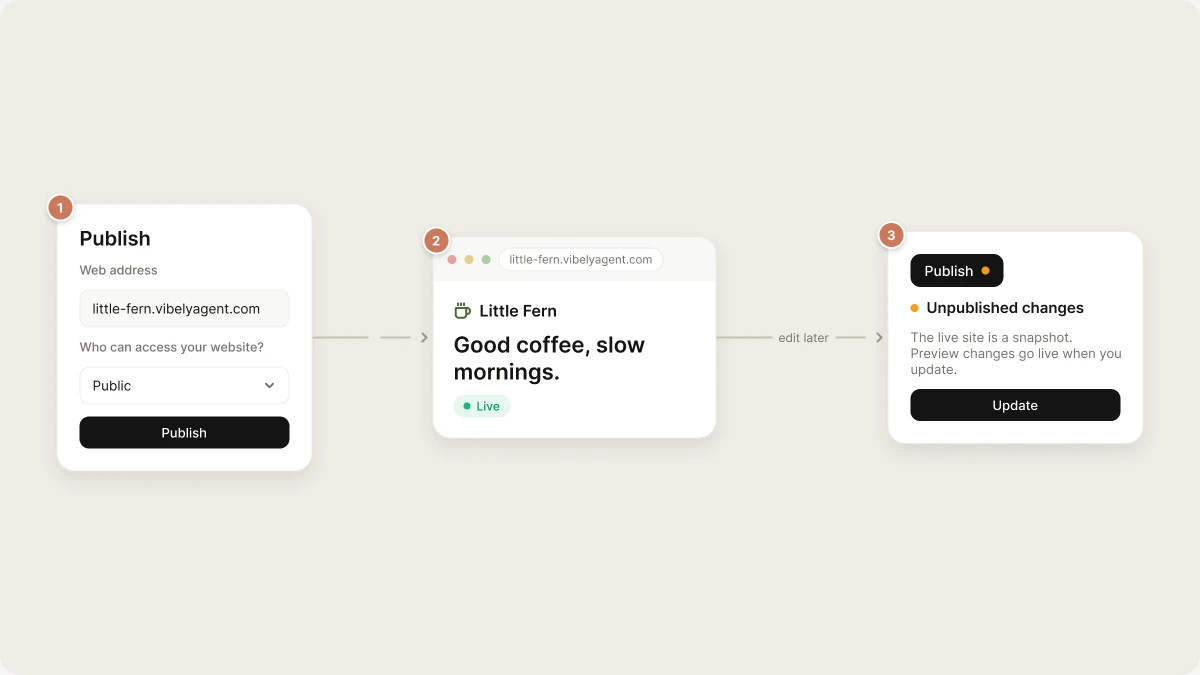
Select Publish in the top right of the editor. Vibely suggests a
vibelyagent.com web address, which you can edit, and asks who can see the website. Select Publish to deploy. After a short build, your app is live at its own vibelyagent.com URL. Send the link to a friend, or invite them to the project to build together.One thing surprises most new users: your live site is a snapshot. Later changes show up in the preview straight away, but the live site only changes when you publish again. The publish panel marks this as Unpublished changes; select Update to push them live. See Publish your app.What “done” looks like after the first turn
The first response should be a real app, not a skeleton:- More than one section or page, with working navigation.
- Real components rather than “coming soon” placeholders.
- Consistent styling throughout.
- Sample content that reads like your brief, not
lorem ipsum.
Other ways to start a project
A typed prompt is the most common starting point, but not the only one:- Attach a design or screenshot: use the + menu in the prompt box to add a mockup, a sketch, or a screenshot of a layout you like, and Vibely uses it as a visual reference. See Project chat.
- Start from a template: open Templates in the sidebar and start from a working app. See Templates.
- Build from a link: point Vibely at a page and it rebuilds the layout as a starting point. See Build from a URL.
- Start from a chat: bring a conversation where you already worked the idea out. See Build from a chat.
Keep going
From idea to store
Ready for a real product? The full journey: shape an idea, build in loops, add a backend, test, and ship.
Prompting best practices
Get better results with clearer prompts.
Add a backend
Store data and sign in users with your own Supabase.
Use your own domain
Put your published app on a domain you own.
Build your first mobile app
Expo, previewing on a real device, and shipping to the stores.