

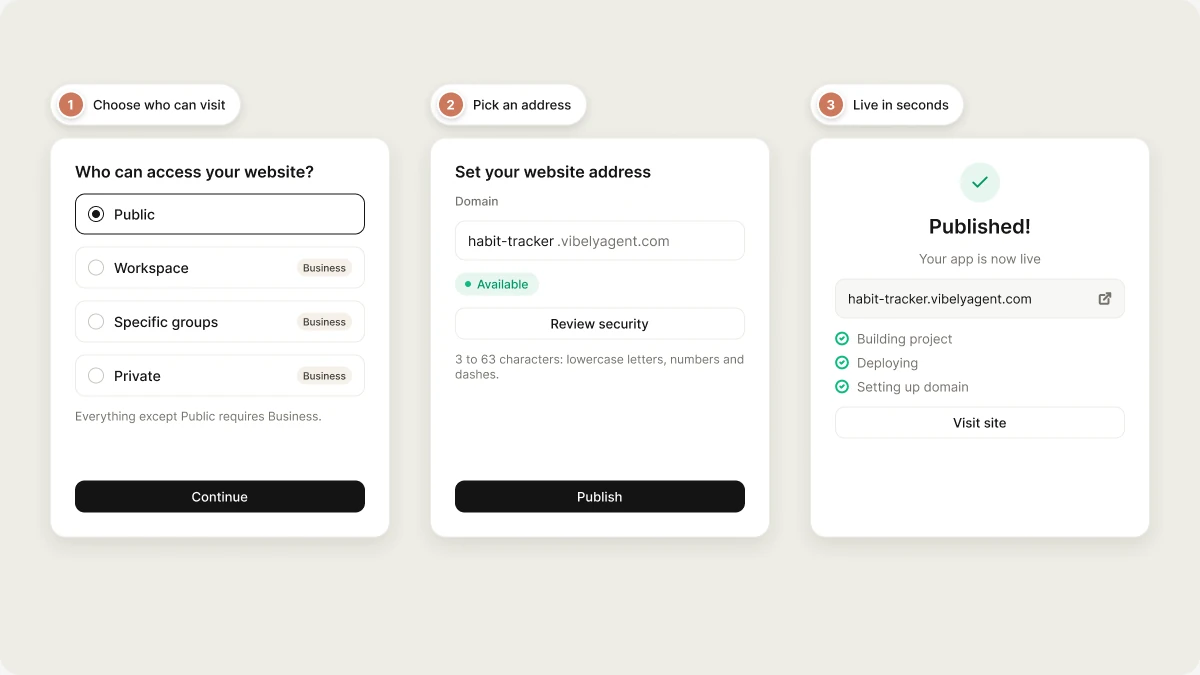
Quick start: publish your first project
1
Click Publish
In your project, click Publish (the rocket button) in the top-right corner of the editor.
2
Choose who can access your website
Pick Public to let anyone with the URL visit, then click Continue. The other options need a Business plan. See Who can see your published app.
3
Click Publish again
Vibely suggests an address based on your project name, ending in
.vibelyagent.com. Keep it or change it, then click Publish. When the deploy finishes, Vibely shows Published! with your live link.The Publish dialog, step by step
1
Open the Publish dialog
Click Publish in the editor header. When the popover opens, Vibely runs a quick basic security scan in the background.
2
Choose who can access your website
Under Who can access your website?, choose Public, Workspace, Specific groups or Private, then click Continue. Everything except Public requires Business.
3
Set your website address
Type the subdomain in the Domain field. Your app is published at
https://<your-name>.vibelyagent.com. Vibely checks availability as you type and shows Available or why the name can’t be used.Names must be 3–63 characters, using lowercase letters, numbers and dashes, and can’t start or end with a dash. Every name is unique across Vibely, so popular names may be taken.If your workspace has branded app URLs turned on, the address uses your workspace’s pattern instead.4
Review security (optional)
Click Review security to add website info and see the review screen, or click Publish straight away.
- Website info: a title (up to 60 characters) and a short description (up to 160 characters). When you publish, Vibely uses them for your live site’s browser-tab title, search description and link previews (
og:title/og:description) on every page where your app’s code still has the template placeholder or no tag at all. A title or description your app’s code sets for a page always wins. See Website info and your app’s own tags. - Ready to publish? shows your URL, Website access and Website info, plus the result of the security scan: No critical security issues detected, or the number of critical issues to review. Critical findings don’t block publishing unless your workspace requires it, but the button changes to Publish anyway so you notice. You can also let Vibely fix the issues first.
5
Publish
Click Publish. Vibely shows Building project, Deploying and Setting up domain as it works. When it’s done you see Published! and Your app is now live, with a link to your site and a shortcut to Connect a custom domain.
Republish to make new changes live
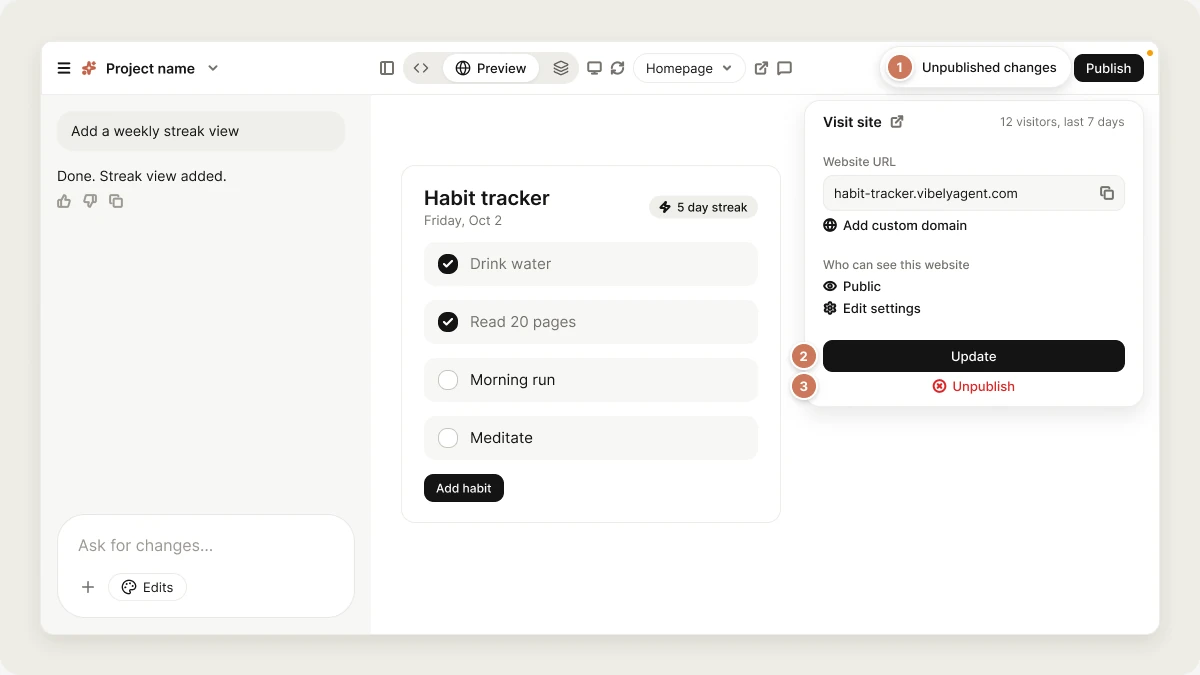
The live site is a snapshot of your last publish. Edits you make in the editor don’t reach it until you publish again. When your project has changes that aren’t live yet, a small dot appears on the Publish button (tooltip Unpublished changes). Open the popover and click Update to deploy them. When there’s nothing new, the button reads Up to date. The popover for a published project shows:- Visit site, and the number of visitors in the last 7 days (click it to open Analytics).
- Website URL with a copy button, and Add custom domain.
- Who can see this website.
- Edit settings to change the URL, visibility or website info, and to run a Deep security scan (an AI review of your codebase that takes about 4 minutes).
- Unpublish, to take the site offline.
Publish from an AI assistant
The Vibely agent in the project chat doesn’t publish for you; use the Publish button. If you work from Claude, ChatGPT or Cursor through the Vibely MCP server, you can ask the assistant to publish (thedeploy_project tool) or take a site offline (unpublish_project).
Take your site offline
Open Publish, click Unpublish at the bottom of the popover, then confirm. (From an AI assistant, theunpublish_project tool does the same.) Unpublishing:
- stops the live URL from working,
- disconnects any custom domains attached to the project,
- resets the site’s address and access settings, so the next publish starts from the first-publish steps,
- keeps your project in the editor, so you can publish again at any time.
Who can publish projects?
By default, owners, admins and editors can publish. Workspace owners and admins can change this in Settings → Permissions → Publish to the web. See Collaboration. Workspace owners and admins can add stricter rules in Settings → Privacy & security → Publishing:
If your workspace requires two-factor authentication, Vibely asks for the 6-digit code from your authenticator app when you publish. Enter it, then publish again. Set up two-factor authentication in account settings.
Who can see your published app
Free and Pro plans
Your published app is Public: anyone with the link can visit it. Make sure you’re ready to share before you publish.Business and Enterprise plans
Choose who can visit in the access step:
Visitors to a non-public site are asked to sign in to Vibely first, and people without access can request it.
This controls who can visit the live site. Who can open the project in the editor is a separate setting. See Share a project.
FAQ
Does publishing cost credits?
Does publishing cost credits?
No. Publishing and republishing don’t use credits. Fixing build errors or security issues with the agent does, like any other build.
Does my published site expire?
Does my published site expire?
No. It stays live until you take it offline, even if you close Vibely.
Does publishing expose my project and code?
Does publishing expose my project and code?
No. Visitors see your running app. Your chat, source code and unpublished changes stay in the editor, controlled by project access.
Why don't I see my latest changes on the live site?
Why don't I see my latest changes on the live site?
The live site only changes when you publish. Look for the dot on the Publish button, open it, and click Update. If you still see the old version, hard-refresh the page.
How do I change my published URL?
How do I change my published URL?
Open Publish → Edit settings → URL, pick a new name, then click Update. Renaming the project doesn’t change the URL. To use your own domain, see Custom domain.
Why is there an "Edit with Vibely" badge on my site?
Why is there an "Edit with Vibely" badge on my site?
Apps published from a Free workspace show a small Edit with Vibely badge on the
vibelyagent.com address. Visitors can dismiss it for 7 days. Upgrading to a paid plan removes it, and it never appears on custom domains.What happens to my site if I downgrade?
What happens to my site if I downgrade?
Your site stays live. On a plan without restricted access, the next publish switches website access back to Public, and the Edit with Vibely badge returns on Free.
Can I publish a mobile app to the App Store or Play Store?
Can I publish a mobile app to the App Store or Play Store?
Publishing here puts your app on the web. Store submission is a separate flow. See Ship your mobile app.
Troubleshooting
Build failed — your project has errors
Build failed — your project has errors
Vibely type-checks and builds your app before deploying it, and stops if either fails. Open the chat: Vibely posts the error there and can fix it. Use Auto-fix with AI in the popover, then publish again.
The built app exceeds size limits
The built app exceeds size limits
The build is too large to deploy. Remove large images, videos or unused dependencies (ask Vibely to find them), then publish again.
A deployment is already in progress
A deployment is already in progress
Only one publish can run per project at a time. Wait for it to finish, then publish again.
That name is already taken
That name is already taken
Subdomains are unique across Vibely. Try a different name, for example with your company name added.
You don't have permission to publish this project
You don't have permission to publish this project
Your role isn’t allowed to publish in this workspace. Ask a workspace owner or admin to change Settings → Permissions → Publish to the web, or to publish for you.
Publishing failed. Please try again.
Publishing failed. Please try again.
A temporary problem stopped the deploy. Try again in a minute. If it keeps failing, contact support with your project URL.
Related
How Vibely hosts your app
What happens after you publish.
Custom domain
Serve your app on your own domain.
SEO and AI search
Get found in search and AI answers.
Monitoring
See errors your visitors hit.