

- Settings → Permissions has the Manage connectors row, which decides which roles can connect and disconnect connectors. Below the role matrix, Admin settings controls which chat connectors the agent may use and whether it may write through any of them, and Custom connectors is where admins register their own REST APIs.
- Settings → Privacy & security has the Remote MCP connectors switch, which turns MCP-based chat connectors on or off for the whole workspace.
- Each connector’s own Tool permissions decide which actions the agent runs without asking. See Approve connector actions.
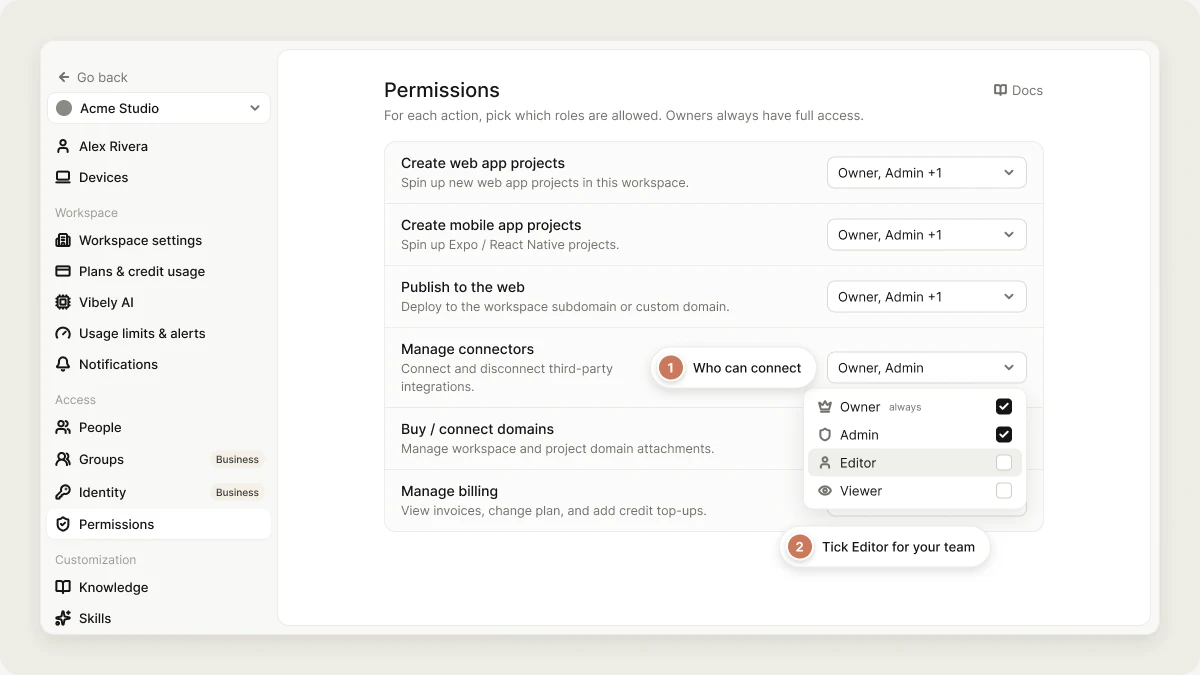
Who can connect connectors
Settings → Permissions is a matrix of capabilities by role. Owners always have every capability; you set the other three roles.
These are the defaults. Manage connectors (“Connect and disconnect third-party integrations”) is owner and admin only out of the box. Tick Editor if your team connects its own tools.
The capability controls more than the Connect button:
- Without it, connecting or disconnecting a connector is refused by the server.
- Without it, the agent doesn’t get its app connector tools (calling a connected app connector, or scaffolding one into the app) when that person is the one prompting. Supabase, Stripe, and the member’s own chat connectors keep working, because they have their own flows.
Chat connector controls
Chat connectors are personal connections: each member signs in with their own account, so there’s no access list to manage. Admins decide which chat connectors are available.Turn off individual chat connectors
Under Admin settings in Settings → Permissions, each chat connector (GitHub, Notion, Linear, Miro, and Figma) and each custom REST connector has a switch. Turning one off blocks every read, write, and send the agent makes through it, for every member of the workspace.Block write and send actions
The first row, Write & send actions for this workspace, is a ceiling over every connector below it.
The switch can only make things stricter. A connector that is already blocked stays blocked whatever this switch says.
The default is on, so writes are allowed subject to each connector’s approval settings. If your workspace needs read-only connectors, turn it off deliberately.
Turn off all MCP connectors
Remote MCP connectors in Settings → Privacy & security (“Allow workspace members to connect MCP servers that Vibely can call from chat”) is a single switch for the whole MCP surface. When it’s off, the agent doesn’t get any MCP server in that workspace, including Figma, Miro, and members’ custom MCP servers. This switch requires the Business plan.Custom REST connectors
Admins can register any REST API as a connector for the workspace: an internal service, or a provider that has no built-in connector. The agent can then call it while building, and projects can connect to it.1
Open the form
In Settings → Permissions, scroll to Custom connectors and click Add connector.
2
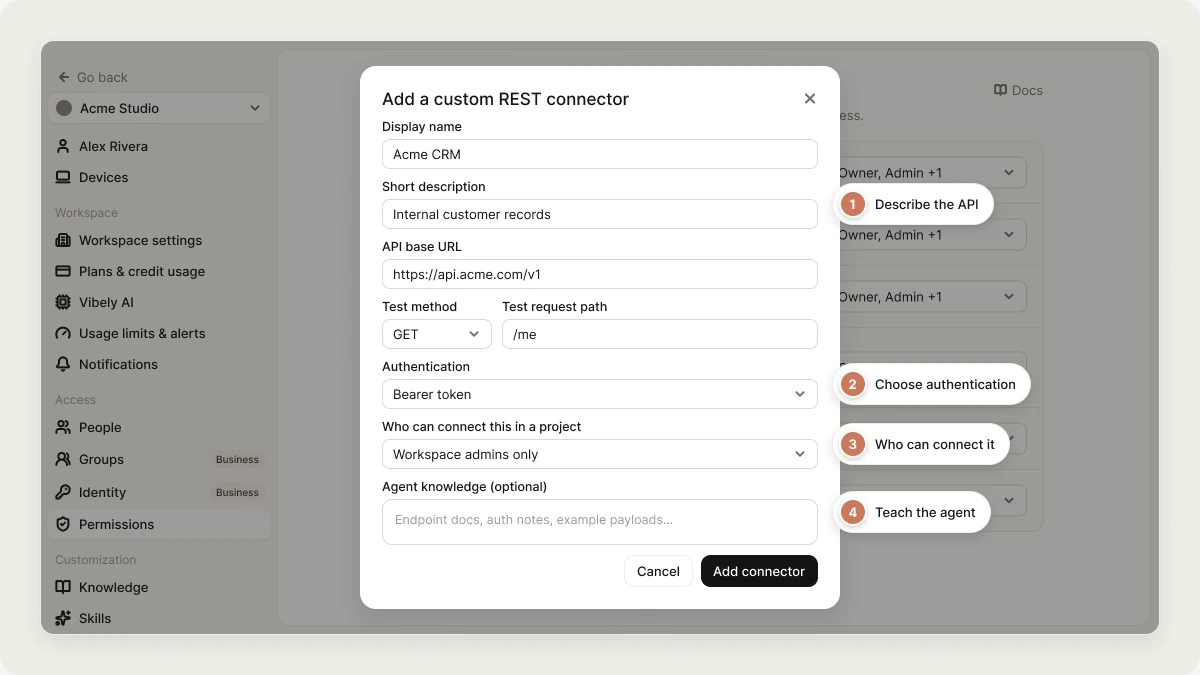
Describe the API
Fill in Display name, Short description, and API base URL. Add a Test method and Test request path; Vibely calls this request to check credentials whenever someone connects.
3
Choose authentication
Pick one: Bearer token, API key (header), API key (query param), Basic auth (username/password), or Advanced (multiple fields).
4
Choose who can connect it
Under Who can connect this in a project, pick Workspace admins only, Admins and editors, or No one (definition only, for now).
5
Teach the agent (optional)
Under Agent knowledge, paste API docs, example requests, or usage notes. The agent reads these when it decides how to call the connector.
One shared account
An app connector runs as one shared workspace account, the connection that was authorized. Every project in the workspace, and every visitor of a published app that calls it, acts through that account.FAQ
Why can't a teammate connect a connector?
Why can't a teammate connect a connector?
By default only owners and admins have Manage connectors. An owner can tick Editor for that row in Settings → Permissions. If the connector is a chat connector, also check that it hasn’t been switched off under Admin settings.
Why doesn't the agent use Figma or my MCP server?
Why doesn't the agent use Figma or my MCP server?
Check whether Remote MCP connectors is off in Settings → Privacy & security, or whether the connector is switched off under Admin settings in Settings → Permissions. Also check the composer’s + → Connectors menu, where each member can switch a chat connector off for themselves.
Why does the agent ask before every change?
Why does the agent ask before every change?
Write and send actions need approval by default. A member can choose Always allow on the approval card, and owners and admins can change a connector’s Tool permissions. See Approve connector actions.
What plan do I need?
What plan do I need?
The Manage connectors capability, the per-connector switches, the write ceiling, and custom REST connectors are available on every plan. The Remote MCP connectors switch requires Business.