

Prerequisites
- A Business workspace. SCIM requests to a workspace on another plan are refused with
SCIM provisioning requires the Business plan. - The owner or admin role, to issue the token.
- Admin access to your IdP.
- SSO is recommended but not required. See SSO.
How SCIM works in Vibely
User provisioning
When your IdP pushes a user:
Pending invitations are reported back to your IdP as active users, so it doesn’t try to create them again.
User deprovisioning
When your IdP deactivates or deletes a user, Vibely removes their membership. If they only had a pending invitation, the invitation is deleted instead. Reactivating them adds them back at the current default role. Names and emails come from the person’s Vibely account and aren’t overwritten from SCIM.Groups
This is where Vibely differs most from other SCIM apps. Vibely always exposes exactly three groups, one per workspace role:
Membership in a group is the role. Adding someone to Admins makes them an admin; removing them drops them back to the default role.
These role groups are separate from Vibely’s member groups, which SCIM can’t create or change.
Supported SCIM operations
Only
userName eq filters are supported; other filters return the full list.
Set up SCIM provisioning
Step 1: Configure SCIM in Vibely
1
Open User provisioning
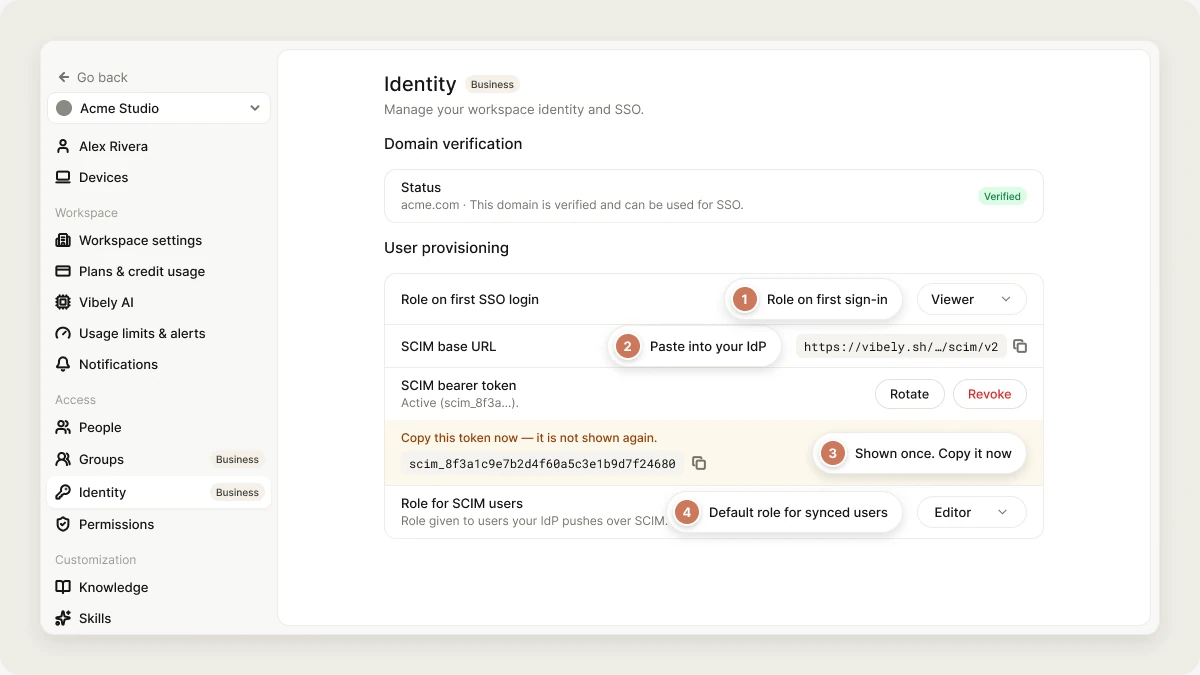
Go to Settings → Identity → User provisioning. The same controls are on Settings → Security center.
2
Copy the SCIM base URL
Copy it from the page rather than typing it. It ends in
/scim/v2.3
Issue a token
Click Issue token and copy the SCIM bearer token straight away. It’s shown once and never again.
4
Set the default role
Role for SCIM users decides what a pushed user becomes: Viewer, Editor (the default), or Admin.
Step 2: Configure SCIM in your IdP
- Okta
- Microsoft Entra ID
- Other providers
- Open your Vibely app → Provisioning → Configure API Integration → Enable API integration.
- Base URL: the SCIM base URL. API Token: the bearer token. Click Test API Credentials.
- Turn on Create Users, Update User Attributes, and Deactivate Users.
- For roles, use Push Groups to push each Okta group to the existing Vibely group with the matching name (Admins, Editors, or Viewers). Don’t create new groups.
Manage SCIM provisioning
Rotate the token
A workspace has one active token. Rotate issues a new one and revokes the old one in the same step, so update your IdP right away. The page identifies the active token by its first 12 characters and shows when it was created and last used. Last used is the quickest way to check your IdP is actually reaching Vibely.Change the default role
Change Role for SCIM users at any time. It applies to people provisioned from then on, and to anyone dropped out of a role group.Turn off SCIM
Click Revoke. Your IdP stops provisioning until you issue a new token. Existing members stay.Troubleshooting
FAQ
Which plans include SCIM?
Which plans include SCIM?
The Business plan.
Can SCIM create my team's groups in Vibely?
Can SCIM create my team's groups in Vibely?
No. SCIM only sets workspace roles through the three role groups. Create member groups yourself in Settings → Groups.
What happens to someone's projects when SCIM removes them?
What happens to someone's projects when SCIM removes them?
Their membership is removed and they lose access. Projects they created stay in the workspace.
Do I need SSO to use SCIM?
Do I need SSO to use SCIM?
No, but they work best together: SCIM decides who’s a member, SSO decides how they sign in.
Related
Identity
Verify your domain and choose how people join.
SSO
Connect your identity provider for sign-in.