

vibely.sh/settings/people).
The Free plan is single-seat, so you can’t invite anyone until the workspace is on Pro or Business.
Who can do what on the People page
Every workspace member can open the page and see the member list. What you can change depends on your role.- Viewers and editors can browse, search, filter, and export the list. Editors can also invite people if an owner or admin grants them Invite members in Settings → Permissions, but only as editors or viewers.
- Admins can invite members, change the roles of editors and viewers, remove editors and viewers, approve requests, and set credit limits. An admin can’t change or remove another admin or the owner.
- The owner can do everything, including transferring ownership.
The member list
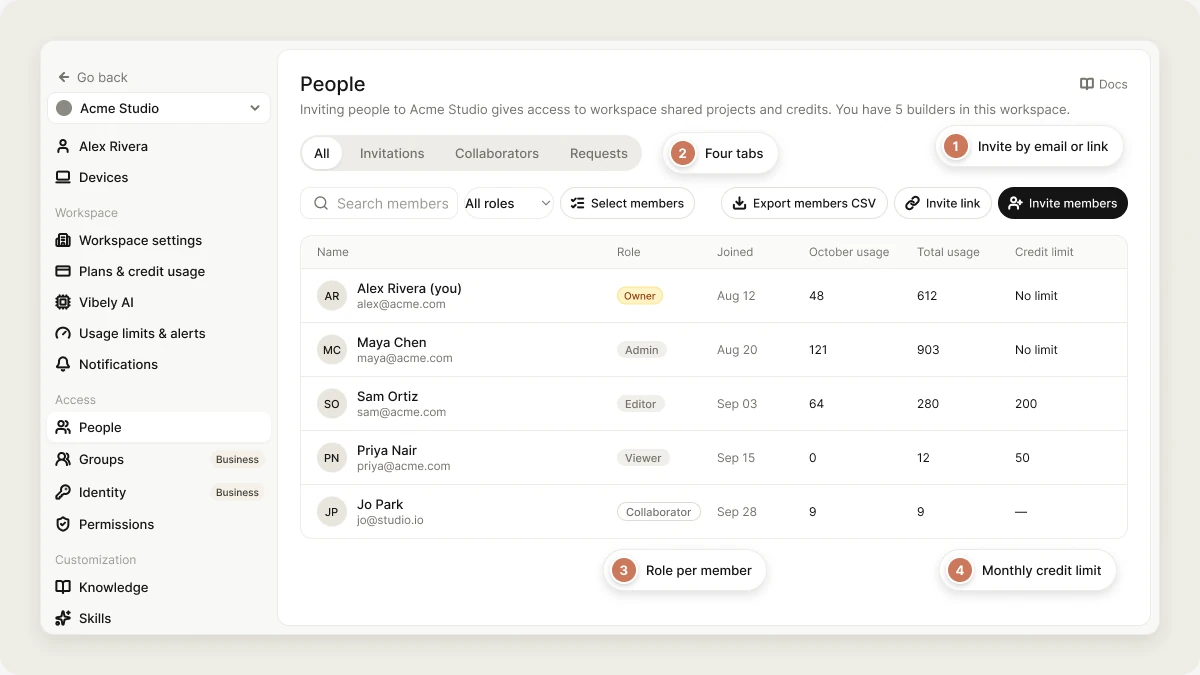
The page has four tabs:
For each member you see:
You can:
- Search members by name or email.
- Filter by role with the All roles menu.
- Sort by any column.
- Select members to remove several people at once.
- Export members CSV to download the list (name, email, role, join date, this month’s usage, total usage, and credit limit). With members selected, the button exports only those.
Invite members
You can invite people by email or with an invite link. Both create an invitation for one email address, and both expire after 7 days.Invite by email
- Go to Settings → People.
- Click Invite members.
- Enter the Email address.
- Choose a role:
- Admin: manages billing, integrations, and the team
- Editor: builds, edits, and publishes projects
- Viewer: read-only access to projects
- Click Send invitation.
Invite by link
Use a link when you’d rather send the invitation yourself, for example in a chat.- Go to Settings → People.
- Click Invite link.
- Choose a role and enter the Invitee email.
- Click Create link. The link is copied to your clipboard.
When an invitation is refused
Automatic user provisioning
Besides invitations, people can join a workspace automatically:- SSO sign-in: on a Business workspace with SSO set up, someone from your verified domain who signs in through your identity provider is added at the role you choose. See Identity.
- SCIM: your identity provider creates and removes members for you. See SCIM.
- Join requests: with Workspace discovery on, people on your email domain can ask to join. See Workspace join requests.
External collaborators
A collaborator is someone who has access to a specific project but isn’t a member of the workspace. You add them from the project’s Share project dialog (click Invite in the editor header), not from the People page. See Collaboration. Collaborators appear on the Collaborators tab with the role Collaborator. Removing one with Remove collaborator takes away their project access. On Business, you can cap what outsiders can be given with External project collaborators in Privacy & security: allow any role, editor at most, viewer at most, or none.Manage existing members
Change a member’s role
Click the role pill next to a member’s name and pick Admin, Editor, or Viewer. The change takes effect immediately.- Giving someone the Admin role requires a paid plan.
- Admins can only change editors and viewers.
Transfer ownership
A workspace has exactly one owner. To hand it over, the owner either picks Transfer ownership in the member’s role menu, or uses Settings → Workspace settings → Transfer ownership. The new owner is promoted and you become an admin in the same step.Remove a member
Open the member’s row menu and choose Remove member, or use Select members to remove several at once. They lose access to the workspace’s projects immediately. Projects they created stay in the workspace. You can’t remove the owner. On your own row, the menu offers Leave workspace instead. See Leave a workspace.Set a per-member credit limit
Per-member credit limits require the Business plan.
- Open the member’s row menu.
- Choose Set credit limit.
- Enter a Monthly credit limit. Enter
0for no limit. - Save.
Workspace join requests
When Workspace discovery is on, people whose email domain matches your workspace can ask to join from their workspace switcher. Their requests appear at the top of the People page under Requests to join this workspace. Click Approve to add them as an Editor, or Deny.Project access requests
When someone asks for access to a project, the request appears under Project access requests and on the Requests tab. Approve it to grant access, or Deny it.Roles and permissions
Each role has default permissions. Owners and admins can change which roles have each permission in Settings → Permissions. The owner always has every permission.Granting Invite members to editors lets them invite editors and viewers only. Inviting an admin always stays an owner or admin action.
FAQ
How long is an invitation valid?
How long is an invitation valid?
Seven days. After that the link stops working. Invite the person again to send a fresh one.
Someone accepted an invitation but can't see the workspace.
Someone accepted an invitation but can't see the workspace.
Invitations are tied to the email address they were sent to. Ask them to sign out and sign in with that exact address.
Can a workspace have more than one owner?
Can a workspace have more than one owner?
No. There’s exactly one owner. Use Transfer ownership to hand the workspace to someone else.
What happens to a removed member's projects?
What happens to a removed member's projects?
They stay in the workspace. The member loses access to them.
Do members cost extra?
Do members cost extra?
No. Plans are priced by credits, not seats. Members spend from the workspace’s shared credits.
Related
Groups
Grant project access to a team at once.
Privacy & security
Restrict invitations and external collaborators.
Identity
Add people automatically through SSO.
Credits and usage
How members’ usage draws from the shared balance.