> ## Documentation Index
> Fetch the complete documentation index at: https://docs.vibely.sh/llms.txt
> Use this file to discover all available pages before exploring further.
# Deploy and host outside Vibely
> Get your code out of Vibely with GitHub sync or a ZIP download, then deploy the web app to your own Cloudflare account or another platform.
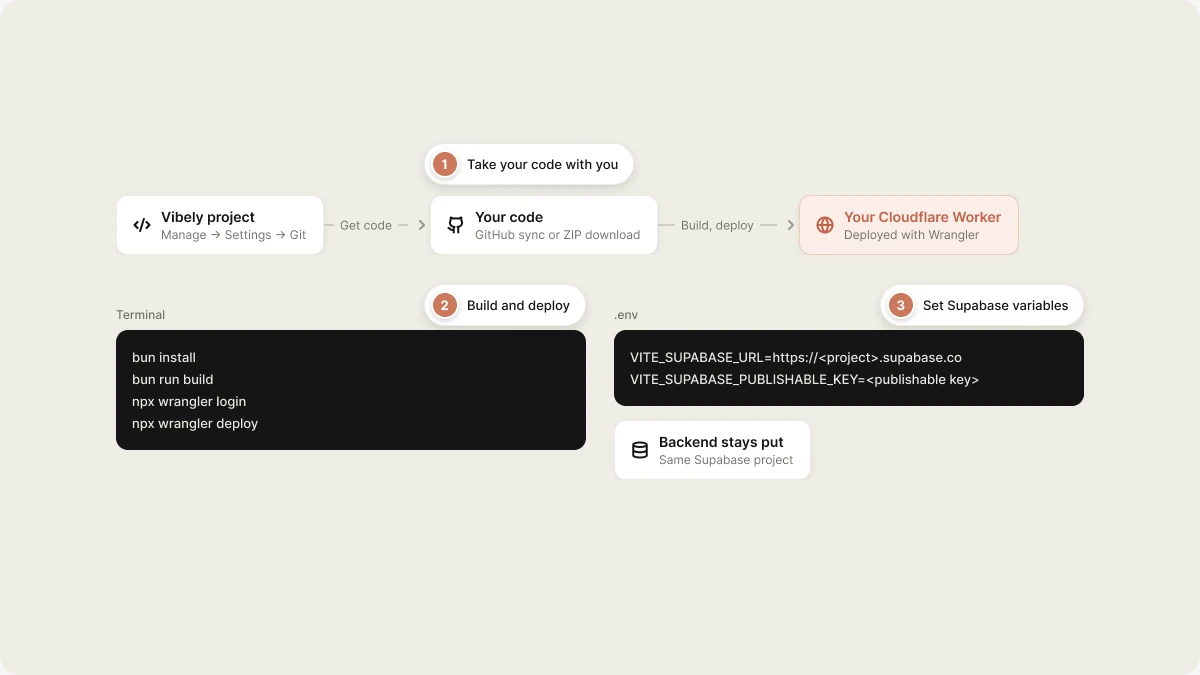
You can host your Vibely web app yourself: take the code out of Vibely, build it, and deploy it to infrastructure you control. This page covers what you need before you move, the recommended path (your own Cloudflare account), other platforms, and your backend.
 Most apps are best served by [Vibely hosting](/features/deploy/hosting). Move when you have a concrete reason, such as a required provider or deployment pipeline. See [Ownership and portability](/features/deploy/ownership) for the trade-offs.
## Before you move
* **Know your stack.** New Vibely web apps use TanStack Start (React, server-side rendering), Vite, TypeScript and Tailwind, managed with `bun`. The build produces a **Cloudflare Worker** (server code plus static assets), not only a folder of static files. The project already includes a `wrangler.jsonc` for this.
* **Your backend doesn't move.** Your data is in your own [Supabase](/integrations/supabase) project. The self-hosted frontend talks to the same project unless you change it.
* **You take over operations.** Builds, deployments, domains, HTTPS, error monitoring and analytics become your job. Vibely's [analytics](/features/grow/analytics) and [monitoring](/features/grow/monitoring) only cover apps Vibely hosts.
* **Mobile apps are different.** Expo projects don't need web hosting. To build and submit them yourself, use your own Expo (EAS) account. See [Ship your mobile app](/features/mobile-apps/ship).
## Get your code
Connect the project to a GitHub repository in **Manage → Settings → Git**. Sync runs both ways: Vibely pushes each change as a commit, and pushes to the linked branch flow back into the project. You can keep building in Vibely while your own pipeline deploys from GitHub. See [Git sync](/integrations/git-sync).
Open **Manage → Settings → Git → Download codebase** and click **Download** for a one-time copy of the source, no repository required. You need edit access to the project, and workspace admins can turn downloads off with **Code downloads** in **Settings → Privacy & security**.
The ZIP leaves out `.env` files, `node_modules` and build output, so you'll set your environment variables yourself.
## Environment variables
Your app reads its Supabase connection from environment variables at build time:
| Variable | Value |
| - | - |
| `VITE_SUPABASE_URL` | Your Supabase project URL, from **Supabase → Project Settings → API** |
| `VITE_SUPABASE_PUBLISHABLE_KEY` | Your project's publishable (anon) key |
Add any other `VITE_` variables your app uses, such as `VITE_STRIPE_PUBLISHABLE_KEY`. `VITE_` variables end up in the browser bundle, so only public keys belong there. Secret keys stay in your Supabase Edge Function secrets, where Vibely put them.
## Deploy to your own Cloudflare account (recommended)
Because the build is a Cloudflare Worker, Cloudflare Workers is the closest match to Vibely hosting and needs no code changes.
Clone your repository (or unzip the download), then install dependencies:
```bash theme={"system"}
bun install
```
Create a `.env` file with the variables above.
```bash theme={"system"}
bun run build
```
Log in to Cloudflare and deploy with Wrangler:
```bash theme={"system"}
npx wrangler login
npx wrangler deploy
```
Change the `name` in `wrangler.jsonc` first if you want a different Worker name.
Connect the GitHub repository to Cloudflare Workers Builds, or run the same build and deploy commands in GitHub Actions, so every push to your branch deploys.
Attach your custom domain to the Worker in the Cloudflare dashboard. If the domain is currently connected to your project in Vibely, disconnect it there first.
## Deploy to another platform
To host on Vercel, Netlify, a Node.js server or a container, the app's server target has to change from Cloudflare Workers to your platform. TanStack Start supports other targets, but it's a change to the build configuration (`vite.config.ts`) and possibly to server code that uses Cloudflare-specific features.
Make this change in your own copy of the code, not in the project you publish from Vibely. Vibely's hosting expects the Cloudflare build, and publishing a project with a different server target will fail.
After switching the target, the steps are the same on any platform:
1. Connect the repository, or upload the build.
2. Set the build command to `bun run build` (or `npm run build`) and the output directory your target produces.
3. Add your environment variables.
4. Deploy, then attach your domain.
## Update sign-in URLs
If your app uses Supabase Auth, add your new domain in **Supabase → Authentication → URL Configuration**: set the **Site URL** and add it to the **Redirect URLs**. Otherwise confirmation emails, password resets and OAuth sign-in send people back to the old address.
Each time you publish the project from Vibely, Vibely updates your Supabase Site URL to the Vibely-hosted address. If your self-hosted domain is the real production site, check the Site URL after any Vibely publish, or stop publishing from Vibely.
## Moving your backend
Your backend is already yours: it's a Supabase project in your account. If you need to move it, for example to a different Supabase organization, region or a self-hosted Supabase:
1. Create the new project and apply your database migrations from the `supabase/migrations` folder in your code.
2. Export your data from the old project and import it into the new one (Supabase's backup and `pg_dump` tools work).
3. Recreate your storage buckets and copy the files.
4. Set your Edge Function secrets and deploy your functions.
5. Reconfigure authentication providers and URL settings.
6. Point the app at the new project with `VITE_SUPABASE_URL` and `VITE_SUPABASE_PUBLISHABLE_KEY`, and reconnect Supabase in Vibely if you keep building there.
See Supabase's own migration guides for the details.
## Related
What you own and your setup options.
Two-way sync with GitHub.
Connect your GitHub account.
Your app's backend and data.
## Related topics
- [How Vibely hosts your app](/features/deploy/hosting.md)
- [Deployment, hosting and ownership options](/features/deploy/ownership.md)
- [Vibely for Enterprise](/introduction/enterprise.md)
- [Sync your project code with GitHub](/integrations/git-sync.md)
- [Publish your Vibely project](/features/deploy/publish.md)
This documentation is built and hosted on [Mintlify](https://mintlify.com), a developer documentation platform.
Most apps are best served by [Vibely hosting](/features/deploy/hosting). Move when you have a concrete reason, such as a required provider or deployment pipeline. See [Ownership and portability](/features/deploy/ownership) for the trade-offs.
## Before you move
* **Know your stack.** New Vibely web apps use TanStack Start (React, server-side rendering), Vite, TypeScript and Tailwind, managed with `bun`. The build produces a **Cloudflare Worker** (server code plus static assets), not only a folder of static files. The project already includes a `wrangler.jsonc` for this.
* **Your backend doesn't move.** Your data is in your own [Supabase](/integrations/supabase) project. The self-hosted frontend talks to the same project unless you change it.
* **You take over operations.** Builds, deployments, domains, HTTPS, error monitoring and analytics become your job. Vibely's [analytics](/features/grow/analytics) and [monitoring](/features/grow/monitoring) only cover apps Vibely hosts.
* **Mobile apps are different.** Expo projects don't need web hosting. To build and submit them yourself, use your own Expo (EAS) account. See [Ship your mobile app](/features/mobile-apps/ship).
## Get your code
Connect the project to a GitHub repository in **Manage → Settings → Git**. Sync runs both ways: Vibely pushes each change as a commit, and pushes to the linked branch flow back into the project. You can keep building in Vibely while your own pipeline deploys from GitHub. See [Git sync](/integrations/git-sync).
Open **Manage → Settings → Git → Download codebase** and click **Download** for a one-time copy of the source, no repository required. You need edit access to the project, and workspace admins can turn downloads off with **Code downloads** in **Settings → Privacy & security**.
The ZIP leaves out `.env` files, `node_modules` and build output, so you'll set your environment variables yourself.
## Environment variables
Your app reads its Supabase connection from environment variables at build time:
| Variable | Value |
| - | - |
| `VITE_SUPABASE_URL` | Your Supabase project URL, from **Supabase → Project Settings → API** |
| `VITE_SUPABASE_PUBLISHABLE_KEY` | Your project's publishable (anon) key |
Add any other `VITE_` variables your app uses, such as `VITE_STRIPE_PUBLISHABLE_KEY`. `VITE_` variables end up in the browser bundle, so only public keys belong there. Secret keys stay in your Supabase Edge Function secrets, where Vibely put them.
## Deploy to your own Cloudflare account (recommended)
Because the build is a Cloudflare Worker, Cloudflare Workers is the closest match to Vibely hosting and needs no code changes.
Clone your repository (or unzip the download), then install dependencies:
```bash theme={"system"}
bun install
```
Create a `.env` file with the variables above.
```bash theme={"system"}
bun run build
```
Log in to Cloudflare and deploy with Wrangler:
```bash theme={"system"}
npx wrangler login
npx wrangler deploy
```
Change the `name` in `wrangler.jsonc` first if you want a different Worker name.
Connect the GitHub repository to Cloudflare Workers Builds, or run the same build and deploy commands in GitHub Actions, so every push to your branch deploys.
Attach your custom domain to the Worker in the Cloudflare dashboard. If the domain is currently connected to your project in Vibely, disconnect it there first.
## Deploy to another platform
To host on Vercel, Netlify, a Node.js server or a container, the app's server target has to change from Cloudflare Workers to your platform. TanStack Start supports other targets, but it's a change to the build configuration (`vite.config.ts`) and possibly to server code that uses Cloudflare-specific features.
Make this change in your own copy of the code, not in the project you publish from Vibely. Vibely's hosting expects the Cloudflare build, and publishing a project with a different server target will fail.
After switching the target, the steps are the same on any platform:
1. Connect the repository, or upload the build.
2. Set the build command to `bun run build` (or `npm run build`) and the output directory your target produces.
3. Add your environment variables.
4. Deploy, then attach your domain.
## Update sign-in URLs
If your app uses Supabase Auth, add your new domain in **Supabase → Authentication → URL Configuration**: set the **Site URL** and add it to the **Redirect URLs**. Otherwise confirmation emails, password resets and OAuth sign-in send people back to the old address.
Each time you publish the project from Vibely, Vibely updates your Supabase Site URL to the Vibely-hosted address. If your self-hosted domain is the real production site, check the Site URL after any Vibely publish, or stop publishing from Vibely.
## Moving your backend
Your backend is already yours: it's a Supabase project in your account. If you need to move it, for example to a different Supabase organization, region or a self-hosted Supabase:
1. Create the new project and apply your database migrations from the `supabase/migrations` folder in your code.
2. Export your data from the old project and import it into the new one (Supabase's backup and `pg_dump` tools work).
3. Recreate your storage buckets and copy the files.
4. Set your Edge Function secrets and deploy your functions.
5. Reconfigure authentication providers and URL settings.
6. Point the app at the new project with `VITE_SUPABASE_URL` and `VITE_SUPABASE_PUBLISHABLE_KEY`, and reconnect Supabase in Vibely if you keep building there.
See Supabase's own migration guides for the details.
## Related
What you own and your setup options.
Two-way sync with GitHub.
Connect your GitHub account.
Your app's backend and data.
## Related topics
- [How Vibely hosts your app](/features/deploy/hosting.md)
- [Deployment, hosting and ownership options](/features/deploy/ownership.md)
- [Vibely for Enterprise](/introduction/enterprise.md)
- [Sync your project code with GitHub](/integrations/git-sync.md)
- [Publish your Vibely project](/features/deploy/publish.md)
This documentation is built and hosted on [Mintlify](https://mintlify.com), a developer documentation platform.